Express method of vessels and apparatuses inspection
Fig.1 shows the scheme of inspection. The operator moves the trolley-type
scanning device along the welded joints and along the vessel generatrices in
accordance with the technique. The multi-channel scanning devices (Type 6) are
used for the simultaneous assessment of the vessel shell metal’s state in the
zones adjacent to the weld.
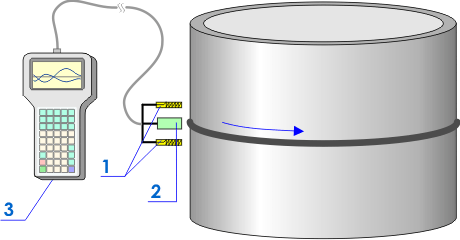
Fig.1. Inspection of the vessel using a
multi-channel scanning device: 1 - sensors for the Hp measurement; 2 - length measuring sensor; 3 -
the TSC-type instrument.
Fig.2 presents the inspection results of the PVC polymerization reactor girth
weld. The local variation of the Hp field corresponds to the stress concentration
zones and welding defects.
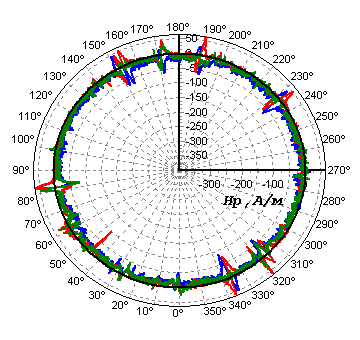
Fig.2. The inspection results of the PVC
polymerization reactor girth weld.
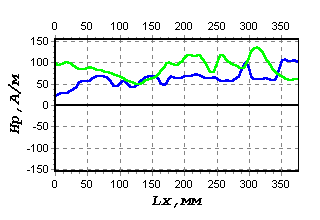
Fig.3, a shows the fragment based on the inspection results of a
welded joint segment in a satisfactory state, and fig.3, b - the
fragment of a cracked segment.
 |
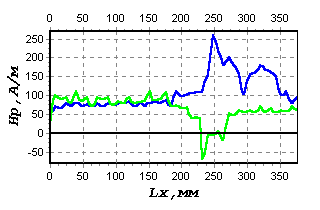 |
Fig.3a. Inspection results of
a welded joint segment in a satisfactory state. |
Fig.3b. Inspection results of
a cracked welded joint segment. |
Fig.4 shows the arrangement of the stress concentration lines (SC lines)
detected during the inspection by the metal magnetic memory method. In this case
the SC lines formation resulted from the loss of the vessel stability. As a
rule, the corrosion-fatigue wear of the metal occurs along the SC line on the
internal surface of the vessel. A crack of the fatigue (or corrosion-fatigue)
nature may occur on the external surface along the SC line.
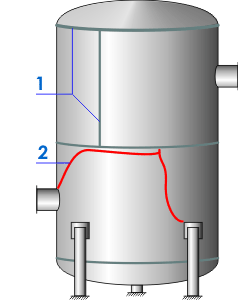
Fig.4. Arrangement of the stress
concentration lines (SC lines): 1 - welds; 2 - SC lines.
Fig.5 shows the example of butt-welded joints inspection on the ammonia
converter casing (feed water heater) at "Nevinnomyssky Azot" JSC. The converter
wall thickness was 200 mm, the diameter was 1550 mm. Inspection was carried out
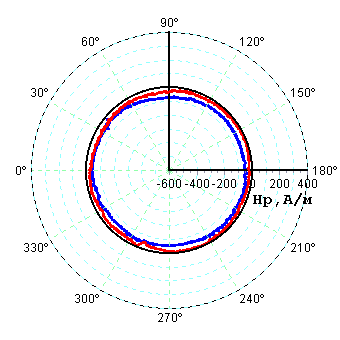
in the in-service state (P=240 atm., T=330°С). Fig.5, a shows the
cracks arrangement on the welded butt joint W12 Local P.W.H.T., fig.5, b indicates the good quality of the welded butt joint W12, and fig.5, c characterizes the unsatisfactory quality of the welded butt joint W12
Local P.W.H.T. with the zones of transverse cracks formation (9-12 hours) and
individual SC zones with developing damages at the depth of 200 mm.
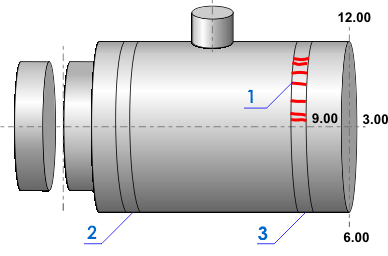
Fig.5a. Arrangement of cracks on
the welded butt joint W12 Local P.W.H.T: 1 - cracks; 2 - welded butt joint W 12;
3 - welded butt joint W12 Local P.W.H.T.
 |
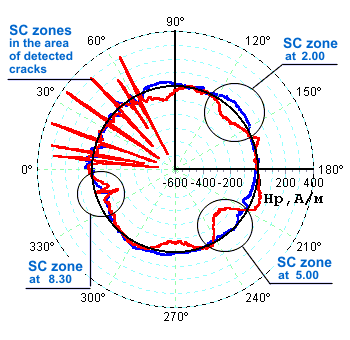 |
Fig.5b. The results of a good
quality welded butt joint W12. |
Fig.5c. The results of an
unsatisfactory quality welded butt joint W12 Local
P.W.H.T. |
In January 1996 The Russian State Technical Supervision Body
(Gosgortechnadzor) approved the "Technique for express inspection of
vessels and apparatuses using the metal magnetic memory method".
This technique may be applied in power engineering, chemical, oil and gas
refining, petrochemical, oil and gas industries during the inspection of vessels
made of the ferromagnetic and paramagnetic (austenite) material. The technique
and the corresponding instruments allow carrying out the inspection of the
vessel’s stress-strain state (under load and after its relief) simultaneously
with flaw detection of welds. The technique also allows performing the
inspection of fillet welds, which cause the problem for conventional NDT
methods.
Based on the primary 100% inspection of the vessel using the MMM method,
there is a possibility of inspection in future of the most stressed and
susceptible to damaging zones only. The acoustic emission method based
in-service control sensors can be installed in these zones with the accuracy of
up to 1 mm.
It is feasible to carry out the vessel shell strengthening in the SC zones,
detected by the MMM method, without waiting for the damaging development. |